OK.
HOW is it already the LAST DAY of February?! I don't know. Time just slips away from me and I still think I am 25 years old.
Anyway.. since it's still February and it's the month of Valentine's manis.. I have a cute berry/red polish to show you today. This comes from Polish 'M. It's a prototype polish, so she had been toying with the idea of releasing it as part of a collection. It didn't make the cut for any number or reasons.. maybe the texture didn't match the others in the line up.. or maybe the color was just not quite right. Whatever the reason, I'm glad she still offered these prototypes up for sale! I picked out 4 and today I'm going to show you prototype 28.
Isn't it super cute?! I don't like red on me very much at all, especially the primary color red tone.. but add a little coolness to it and I love it. I love how this looks against my skin and the tiny glitters in contrasting colors really make the polish special!
Application notes, since you must be wondering: easy peasy.. 2 coats here, but it was fairly opaque in one. No issues with application! I cleaned up around the edges because I was a bit heavy handed with the top coat (I really wanted that glassy look!).
This polish is currently still available in the shop, but I don't know how many, so if you like this, go now! If you miss it, no worries.. there are some other polishes on SALE from the Holiday collection, including a few red/berry shades. Also, just check the shop again later! If you want to be the first to know about any restock events then I encourage you to join the Polish 'M group on Facebook.
Gosh, folks.. so sorry about the LONG break! Work got the best of me I suppose and now that I have time I was a little ashamed to notice how long it had been since I wrote! Gasp!
You can find Polish 'M here:
shop: http://www.polishm.com
IG: @creativenailchick
Facebook group: Polish 'M Fans
Until next time (hopefully not too long!)..
XO,
Vanessa
Showing posts with label indie polish. Show all posts
Tuesday, February 28, 2017
Wednesday, February 8, 2017
Wednesday Water marble
Easy nail art?
So.. I'm cheating a little bit.. I did this water marble over the weekend, but.. it's ok, right? First of all.. let me just say that I am far far from being really good at this technique. I've been practicing and it's gotten easier, but it's still very intimidating, no matter how many tutorial videos I watch! I am determined, though, to perfect my technique and get more consistent.
The water marble I'm showing you took a few tries to get to where I liked it. First, I had to experiment with the polishes themselves. I was dead set on using a particular cream color, but it just wasn't cooperating as well as the others. It never really spread out well and that made my bullseye really small.. this makes it difficult to do any kind of dragging. I changed out that polish for a white and that was the trick! So.. then I was ready to try again. Here is the outcome... what do you think?
I had intended to do 2 fingers, but I didn't like how my pointer turned out, and then to make it worse, I accidentally bumped it when removing the latex barrier. I do like how this turned out, though.. a skittle mani. The polishes I used are all from Polish My Life. Shown are: 50's Mint Fridge (thumb), Breakfast on Fifth (pointer and pinkie), Reject Club Pink (ring). The water marble was done using those polishes plus Stripped. Which one is your favorite color? I really like Breakfast on Fifth!
I wasn't done yet. Since I wanted to try a slightly different pattern, I put Cinderella to work. This was pretty challenging because of the latex barrier! I prepped pointer and middle, which meant I had to use my left hand to do the dropping (so nervous!!). The ring and pinkie weren't too bad. My nail beds are so much shorter on my pointer and middle, so she doesn't like to show off very often. But.. I like how these turned out (especially the pinkie!).. what do you think?
If you are new to water marbling I highly recommend watching some tutorial videos!! I really like the ones by Tiffany (Mrswhite8907 on YouTube) and Colette (My Simple Little Pleasures on YouTube). The tool I use for creating my designs is a regular pointy toothpick, but you can get specialized tools or maybe use a small dotting tool. To make clean up easier I do recommend protecting the skin with something like tape or a latex barrier. I use Bliss Kiss Simply Peel.
Thanks for stopping by!
XO,
Vanessa
Friday, January 6, 2017
Polish for Pit Bulls Christmas 2016 edition
Hi, everyone!
I'll have a few posts coming up since I've had a little more time to write. Whee!! The first one I have for you is the nail polish collaboration between Polish 'M and Cameo Colours Lacquers. These ladies, Michelle and Cameo, have been known to get together to release a limited edition duo. Let's see what we have...
Cameo Colours Lacquers: Paw Prints in the Snow
This is a beautiful and sparkly silver in a clear base. Mostly it is straight up silver holo microflakes, but there is just a hint of green micro flakes that I find so interesting with this polish. Application was so easy and built up to my liking in 3 thin coats. It dried down fairly smooth, so I skipped the top coat. I wish I'd gotten a sun shot of this so you could really see how this polish just shines and sparkles. Gorgeous!
Polish 'M: Happy Howlidays
I don't have many green polishes in my collection because they tend to clash (or so I believe) with my olive-based tone. But there is something about Polish 'M greens that I love! I love the tiny bits of contrasting micro flakes in this. You might think it's difficult to remove this polish (and the other), but I didn't have any trouble using the Deborah Lipmann method. Application was effortless, as I've come to expect from Polish 'M. It dried just a teensy bit textured, but a layer of glossy top coat was all it took to get it smooth. Shown is 2 coats plus top coat.
Aren't the names so cute?! I love how they somehow get a dog reference in the names. I don't know for sure, but there may be another duo coming up in late January in time for Valentine's Day. If you think you might be interested, I strongly encourage you to follow Polish 'M and Cameo Colours on IG, or join their groups on Facebook. :) I love that they donate such a large amount of the cost directly to two separate pit bull rescue facilities. For this holiday duo, the cost was $20, and $12 was donated.. so generous of the ladies!
XO,
Vanessa
Cameo Colours Lacquers (shop) IG @cameocolourslacquers
Polish 'M (shop) IG @creativenailchick
I'll have a few posts coming up since I've had a little more time to write. Whee!! The first one I have for you is the nail polish collaboration between Polish 'M and Cameo Colours Lacquers. These ladies, Michelle and Cameo, have been known to get together to release a limited edition duo. Let's see what we have...
Cameo Colours Lacquers: Paw Prints in the Snow
This is a beautiful and sparkly silver in a clear base. Mostly it is straight up silver holo microflakes, but there is just a hint of green micro flakes that I find so interesting with this polish. Application was so easy and built up to my liking in 3 thin coats. It dried down fairly smooth, so I skipped the top coat. I wish I'd gotten a sun shot of this so you could really see how this polish just shines and sparkles. Gorgeous!
Polish 'M: Happy Howlidays
I don't have many green polishes in my collection because they tend to clash (or so I believe) with my olive-based tone. But there is something about Polish 'M greens that I love! I love the tiny bits of contrasting micro flakes in this. You might think it's difficult to remove this polish (and the other), but I didn't have any trouble using the Deborah Lipmann method. Application was effortless, as I've come to expect from Polish 'M. It dried just a teensy bit textured, but a layer of glossy top coat was all it took to get it smooth. Shown is 2 coats plus top coat.
Aren't the names so cute?! I love how they somehow get a dog reference in the names. I don't know for sure, but there may be another duo coming up in late January in time for Valentine's Day. If you think you might be interested, I strongly encourage you to follow Polish 'M and Cameo Colours on IG, or join their groups on Facebook. :) I love that they donate such a large amount of the cost directly to two separate pit bull rescue facilities. For this holiday duo, the cost was $20, and $12 was donated.. so generous of the ladies!
XO,
Vanessa
Cameo Colours Lacquers (shop) IG @cameocolourslacquers
Polish 'M (shop) IG @creativenailchick
Wednesday, November 30, 2016
Zoya August
One more for November..
I think I've always been into polishing my nails, but it didn't really became more of a hobby until I bought my first color from butter LONDON. It was a deep red called "Saucy Jack". Soon after that I tried my first color from Zoya, and that's when I really became obsessed! Even though most of my polish purchases are now indie brands, I still really love the Zoya formulas and the range of colors. I don't buy every new collection, but I definitely do keep updated on the newest releases. This Fall Zoya released an amazing collection called Urban Grunge. Of course I looked for reviews and watched my favorite live swatch lady on YouTube-- jessFACE90. oooh.. I was so excited! I decided to wait a little while, convincing myself that the shades would be around for some time. Not long after, though, I found someone on IG who was selling her extra bottle of "August" for a great price! I had to get it.
Zoya August is described as a full coverage gray, like a fine expensive leather with mid-range, balanced tone. It should flatter all skin colors. This is promoted as a one-coat cream, but my photos show 2 coats. I ALMOST got it in one coat, but it wasn't quite there for me. Maybe it will the next time I use it.
I *really* love this color! It's so moody! That is exactly my personality.. it may as well be called "Vanessa" instead of August. Although.. fun fact.. my birthday is in August, so.... I guess it's perfectly named anyway. Incidentally, Zoya does have a polish named Vanessa! It's a bright berry red color. I will feature it in a future post.
Even though I like the look of plain glossy grey, I wanted to add a little something. This is August with one coat of Bliss Polish Holo Bliss, a subtle holographic topper in a clear base. It doesn't really stand out much more in regular lighting, but in the sun you'll notice a little holo rainbow on your nails.
..and because why not? Here is another photo of August with one coat of Bliss Polish Holo Bling, which is an amped up version of Holo Bliss. Holo Bling also contains tiny holographic micro glitters and I prefer the look of this. It works well over so many different colors, so of course I think it's a must-have in any polish collection.
That's it for today! Zoya had an AMAZING sale on Black Friday and I couldn't pass it up. I picked up 4 shades and the naked manicure starter system. I can hardly wait to try that out, as well as the new colors! Two are from the Urban Grunge collection (Merida & Troy) and two are from older collections (Dahlia- a black pixie dust, and Tove--a slate gray satin finish). So. Excited!
Thanks for stopping by!
XO,
Vanessa
Saturday, November 26, 2016
Polish My Life Girls and Boys NYC edition
Organization is not my forte
Are we still here?!Hey, everyone! Wow, it's been so long since I've put together an entry. It got a little crazy both at work and home for me. While I still polished my nails often (check my IG @ace_vanessa), I didn't write about anything. It's been about 3 weeks since I published anything! I have a lot of things on my mind, but I'm sure I won't remember it all.
So, now it's after Thanksgiving. I hope, if you celebrate, that it was nice! For several years now, my family and I have made a very short trip to spend time with a cousin of mine (dad's first cousin). It's so low-key and low-stress... we really love going there, especially my son!
Another thing keeping my mind occupied is my training for a half-marathon. This'll be the sixth year for our local event. I have been a participant from the beginning and I intend, as long as I am able, to be a part of it every year! Our event is held on the second Sunday of December. The first 4 years I completed the full marathon, but last year and this year I am only working on the half-marathon. It's still quite a bit of training, but requires much less time. Maybe some day I'll be up for a marathon again. Until then, I'll just focus on being healthy! Any ideas on how I should paint my nails for race day? I'm thinking a simple swatch of a favorite polish.. oh, but what color?
Speaking of POLISH.. I have some pictures to share with you today!! These polishes are all from the Polish My Life NYC girls & boys edition. I'm a member of Shaneka's facebook group and one of the perks is being able to order polishes a little bit early. I am so glad I picked these up! The glitter bomb in my later photos is a polish I won as part of a contest in her group! I was super excited and it just seemed like it would work well with the polishes. Let me know what you think! I'll start you off with the swatches and then a little nail art.
9 to 5 Hustle
Swatch shows 2 coats plus top coat, but this one is a definite one-coater. I found the formula to be so smooth and silky. I am super impressed, and the color is so fantastic! Perfect for anywhere---office environment or otherwise. So classy.. love it!
Concrete Jungle
Swatch shows 2 coats plus top coat. This one has a thinner consistency, but not too thin. It was very easy to work with, just like 9 to 5 Hustle. I struggle to find greens that work with my olive based light skin tone. I think this one looks great, and I bet it looks great on other tones as well. It's not so bright to call too much attention, but still makes a statement.
Skyscraper
Perfect polish! Swatch shows 1 coat and no top coat. Holy smokes.. it's amazing! I hardly EVER get a polish completely opaque in 1 effortless coat, but that's exactly how this one was. WOW. It's my favorite from the group for sure. It practically applied itself!
Easy nail art?
I wouldn't call a water marble EASY, by any stretch. I struggle to get a proper bullseye, and if I happen to accomplish that, then I usually mess up the dragging. I think this one is semi-successful. I decided to pair the polishes with the December 2016 polish, a glitter bomb called Holiday Gemstones. It works well as a mid-coverage glitter topper over various bases, or on its own. My photo shows 1 coat plus one sponged coat.
There you have it! Shop link for Polish my Life will be below if you are interested (if you read this before Cyber Monday, November 28, they are 40% off.. a total steal, so go now!).
Thanks for reading! Let me know in the comments what you think, or if anything else is on your mind!
XO,
Vanessa
Shop:
Polish My Life
Friday, November 4, 2016
Bliss Polish - Bliss Basix
Bliss Basix cremes
Just about everyone loves a good creme polish! When I first found Bliss Polish I was mesmerized by all the pretty holographic polishes in the shop. I did grab several and really love them. Earlier this year Bliss Polish released a new collection called Bliss Basix. These are gorgeous staple shades for any polish collection in a classic creme finish. I waited a little while before purchasing any since I have gobs of Zoya and butter London cremes, but I gave in after reading so many great reviews. I had to see for myself!
Today I'm going to show you a few of the shades. The formula on each one was pretty much the same and was really, really smooth and effortless. Now I am regretting just a tiny bit that I didn't grab the first full collection, but I am happy to have the ones I managed to snag! Let's get to it!
Waves
periwinkle blue creme.
Application: I applied super thin coats, so shown here is 3 plus glossy top coat (though these are super shiny on their own), but you can definitely get this one in 2 coats. Next time that is probably what I will do. I was just being overly (and unnecessarily) cautious!
(Indirect natural light)
(Indirect natural light-slight shade)
(ottlite)
I'm hoping this will be restocked soon, because I think you NEED this topper. It's called Holo Bling and is a holographic top coat with a small sprinkle of holographic micro glitter. It's so amazing and will dress up any creme! I always apply a regular top coat over Holo Bling just to keep things lasting longer. Trust me.. this is so pretty. I love the little twinkles from the micro glitters.
Here are a few more of the shades.
Asphalt (2 coats plus t.c. under ottlite)
Eggplant (2 coats plus t.c. under ottlite).
Port (2 coats plus t.c. under ottlite)
I have a handful of other shades. Even though many are no longer available, I'll probably still share with you because I believe there will be other collections. It's my understanding these polishes stamp and water marble well. I have not tried either, but if I do I'll post about it!
Bliss Polish links:
Instagram: @blisspolish
shop: Bliss Polish
Thanks for stopping by! Let me know what you think of these cremes in the comments. :)
XO,
Vanessa
Thursday, November 3, 2016
Pipe Dream Polish -- first impression
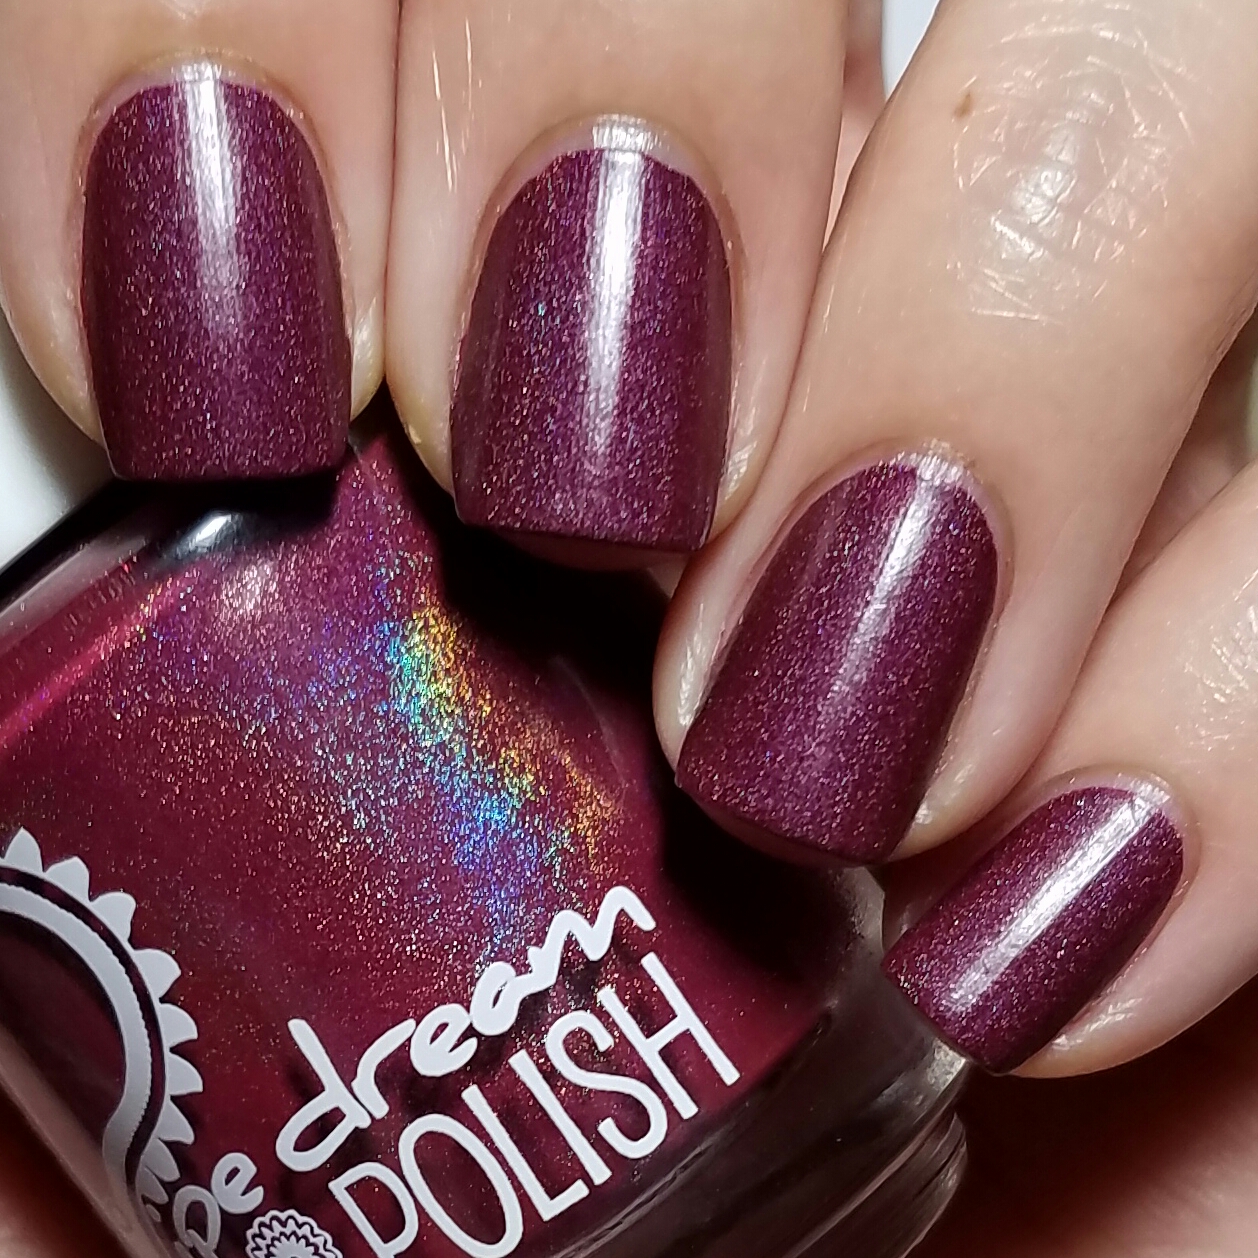
Pipe Dream Polish: Don't Scream!
Hey, y'all! Last month I purchased my first Pipe Down This Love is Bliss collaboration box. The makers from Pipe Dream Polish, Love, Angeline, and Bliss Polish put together a themed box and feature a special guest. In October 2016 the theme was Goosebumps and the special guest was none other than Polish 'M! I was hoping I'd be fast enough to grab a box (and I was!) since it was limited to 55. Today I am going to show you a few photos of the Pipe Dream Polish release. I'll write about the other polishes in future posts!
Don't Scream!
This is a burgundy/maroon creme with subtle holo. It dries to a semi-matte/satin finish which I found SO beautiful.
Application: I applied 2 thin coats, but this can certainly be a one-coater if you've got the hand and the skill! I am sure I would get it everywhere if I tried to do that, so 2 safe coats it is for me. Even without top coat the subtle holo will show up when the sun hits your nails. Of course, a glossy top coat will make it more apparent, but really.. this polish is so pretty with or without.
Regular indoor lighting, no top coat.
Ottlite
This is my first Pipe Dream Polish and I am super impressed. The formula was so silky and smooth, and EASY to apply. I did wear this over a base coat (Polish My Life Saved by the Base), and no top coat. No staining and no chips over 3 days. Since this polish turned out so well, I will definitely try to get my hands on more!
Be sure to follow the group on Instagram @pipedownthisloveisbliss for future collaborations!
XO,
Vanessa
Wednesday, November 2, 2016
Polish for Pit Bulls - 2016 Halloween edition
Polishes for a cause
How's everyone doing today? I've got a quick post today with two Halloween-themed polishes from Polish 'M (my hands-down favorite indie brand) and Cameo Colours Lacquers. They get together regularly to offer a "polish for pit bulls" duo. The cost is usually $20 and $12 of that goes directly to the animal rescue of their choice. That's quite a big chunk from the duo, and I love that they support a local charity. I meant to share this BEFORE Halloween, but life got a little crazy! Anyway, let's take a look at the polishes!Cameo Colours Lacquers Pawple People Licker
dusty purple base with shimmer and lots of flakies
application notes: 2 easy coats! I painted the first coat very thinly and the second a little more than a normal coat to even it all out. It dried down just a tiny bit textured; I applied a regular coat of Rica Glossy Glam to smooth it all out.
Polish 'M 4 Legged Shadow
black base with purple shimmer and oodles of shreds and holo glitters
application notes: 3 thin (easy) coats. You can do 2 regular coats and it'll be fine. At 2 coats it was mostly there, but I wanted it to be even darker, so I went for the third coat. Dried ever so slightly textured from the shreds and glitters, but nothing a regular layer of top coat couldn't take care of.
There were 30 duos available this time around and they sold all of them in a day! Even though these are no longer available, I'm pretty sure the ladies will offer a Holiday version! You can get more information if you are on Facebook and join one or both of their groups, or on Instagram! I'll link their shops and IG information below.
What did you think of these polishes? Which one do you like the most? I think they are both really pretty! My favorite is 4 Legged Shadow because I love love love black-based and deep dark polishes.
Thanks for reading!
XO,
Vanessa
Shop Polish 'M
Shop Cameo Colours Lacquers
IG Polish 'M: @creativenailchick
IG Cameo Colours Lacquers: @cameocolourslacquers
Tuesday, October 25, 2016
Polish 'M: coffee and dessert
inspiration from coffee and dessert
Hi, all! Today I have a beautiful duo of polishes to show you from one of my favorite indie brands: Polish 'M. These two polishes were inspired from some of my favorite things ever: DESSERT & coffee! Let's get right into them!Instant Human (Just add coffee)
(blackened brown faint holo with a rainbow of micro metallic glitter and shimmery micro flakes)
Application: 3 thin coats, but 2 regular coats should work just fine! This dries a tiny bit textured and a regular layer of your favorite top coat will do the trick and give you a smooth finish. Applies just like a normal creme polish and the glitters/flakes spread themselves out nicely. I love dark brown polishes.. they are edgy but still very office appropriate. What do you think?
Oh, I wanted to see this matte, too. For this mani I used Polish My Life Mat(t)erialistic.
Life is Uncertain (Eat dessert first)
(beige nude faint holo with a rainbow of metallic glitter and shimmery micro flakes)
Application: 2 coats! My first coat was very thin, so I thought I would need 3, but I liked it after 2. Like Instant Human, this also dries a tiny bit textured, so use a glossy top coat for a smooth finish. This contains the same glitter mix but is much more visible thanks to the lighter base. Let's talk about that.. isn't is just gorgeous?! In some lights I noticed it had a slight pinky tone to it. This is definitely office appropriate and honestly.. good for any day. Sophisticated. Love this one, and you know how I love my dark polishes!
And again.. with matte top coat. It just looks so soft, like a fleecy blanket.
These two polishes are currently still available in the Polish 'M shop! You can get them individually for $9 each, or as part of a "quad" for $25 (an awesome deal!), which will also include two full-sized cuticle oils in the scents of Pecan Pie and Cafe Mocha. They smell amazing! In my experience, the oils work really well with my skin. Could just be me, but I swear my nails grow a lot faster now. Related to the oils? hmmmm...
Thanks for stopping by! I hope you enjoyed this post. Let me know what you think below!
XO,
Vanessa
Shop links:
Polish 'M
Polish My Life
Thursday, October 13, 2016
Nibs & Nails: Brandy Dazzle
Diamine ink polish inspiration polish duo from Polish 'M
Audrey from Right on the Nail has this really fun series where she asks makers to create a polish using a fountain pen ink as their inspiration. Michelle from Polish 'M wound up creating two polishes for her challenge, one that represents the ink in the vial and one that represents the ink in its dried state. When I saw the promo bottle shots I made it my mission to grab a duo. As I've said before, I have a hard time finding a good red polish, but I had a feeling this one would be perfect. Also, I just knew the rust-colored polish would be spot on for fall. Happily, I was NOT disappointed.Before I get too far into my post, please check out Audrey's post that also includes the inspiration ink! She has so many great photos on there!
Application notes:
Brandy Dazzle: 2 coats plus top coat. Smooth and effortless application. Perfect polish!
Brandy Dazzle 2.0: 3 thin coats plus top coat. Easy application, minimal clean up on a couple of nails. Amazing color and depth.
Brandy Dazzle: A gorgeous burnt orange/rust color with gold shimmer throughout. Photo taken in indirect natural light.
Brandy Dazzle 2.0: A perfect vampy red with slight shimmer throughout, great for fall or anytime! I'm smitten! Photo taken in indirect natural light.
The next photos are more recent with shorter nails (they look so tiny now!). I couldn't help noticing that the microglitters in A Bit Corny were similar in color to these polishes, so I tried a little skittle. What do you think? For these photos I applied 2 coats each on Brandy Dazzle and Brandy Dazzle 2.0, and 3 for A Bit Corny. LOOK at the shimmer.. ugh.. so pretty. I really love these polishes and I think you would, too! First photo taken in indirect natural light; second photo under artificial (ottlight) light with matte top coat. You know I had to see what this looked like matte!
Shop Polish 'M
Follow Polish 'M on Instagram @creativenailchick
Thanks for reading!
XO,
Vanessa
Monday, October 10, 2016
Simple dots using Polish 'M
Double side dots
Hey, all! I've got another really simple nail art look for you today. I got this idea from Amy @mcpolish on Instagram. I love this method! It's so easy, and you don't really need any special tools. Today I chose to keep my base color the same on all nails, but you could do a contrasting nail and it will look good! The polishes I chose are two from Polish 'M: Woodland Stroll (fall 2016 collection) and Back to Reality (summer 2016 Back to Reality collection). I've got regular swatch photos of these polishes on my blog if you want to see them alone.Double side dots: I used the small end of a dotting tool since I just trimmed and filed my nails and they are a bit smaller. You don't need a dotting tool, though! You can do this with a slightly blunt pencil tip, a bobby pin or a toothpick if you want! Just put a blob of your dotting polish on a paper and dip in your tool of choice to gather some polish, and dot. Seal it all in with your favorite glossy top coat. I used Polish My Life Le Top Coat.
![]() |
| indirect natural light |
What do you think of this look? :)
Thanks for stopping by!
XO,
Vanessa
Subscribe to:
Posts (Atom)


